2024-03-22
Building multi-window applications with React Native visionOS
Working with multiple windows
Contents
Introduction
React Native visionOS allows users to create multi-window applications, this feature allows you to build feature-rich apps that use full capabilities of the framework. In this blog post we will go over how you can build multi-window counter application with global state.

Setup
In order to get started, let's create a new visionOS application using this command:
npx @callstack/react-native-visionos@latest init MultiWindowAppNext, go inside the generated project and install pods inside of visionOS folder:
cd MultiWindowApp/visionos && bundle install && bundle exec pod installAfter installing pods, you can run following command to build the app to the simulator:
yarn visionosAdding second window
Note: Adding new windows is described in detail in the documentation.
This process involves three steps:
- Enable Multiple Window support
- Add native entry point
- Declare new JS component
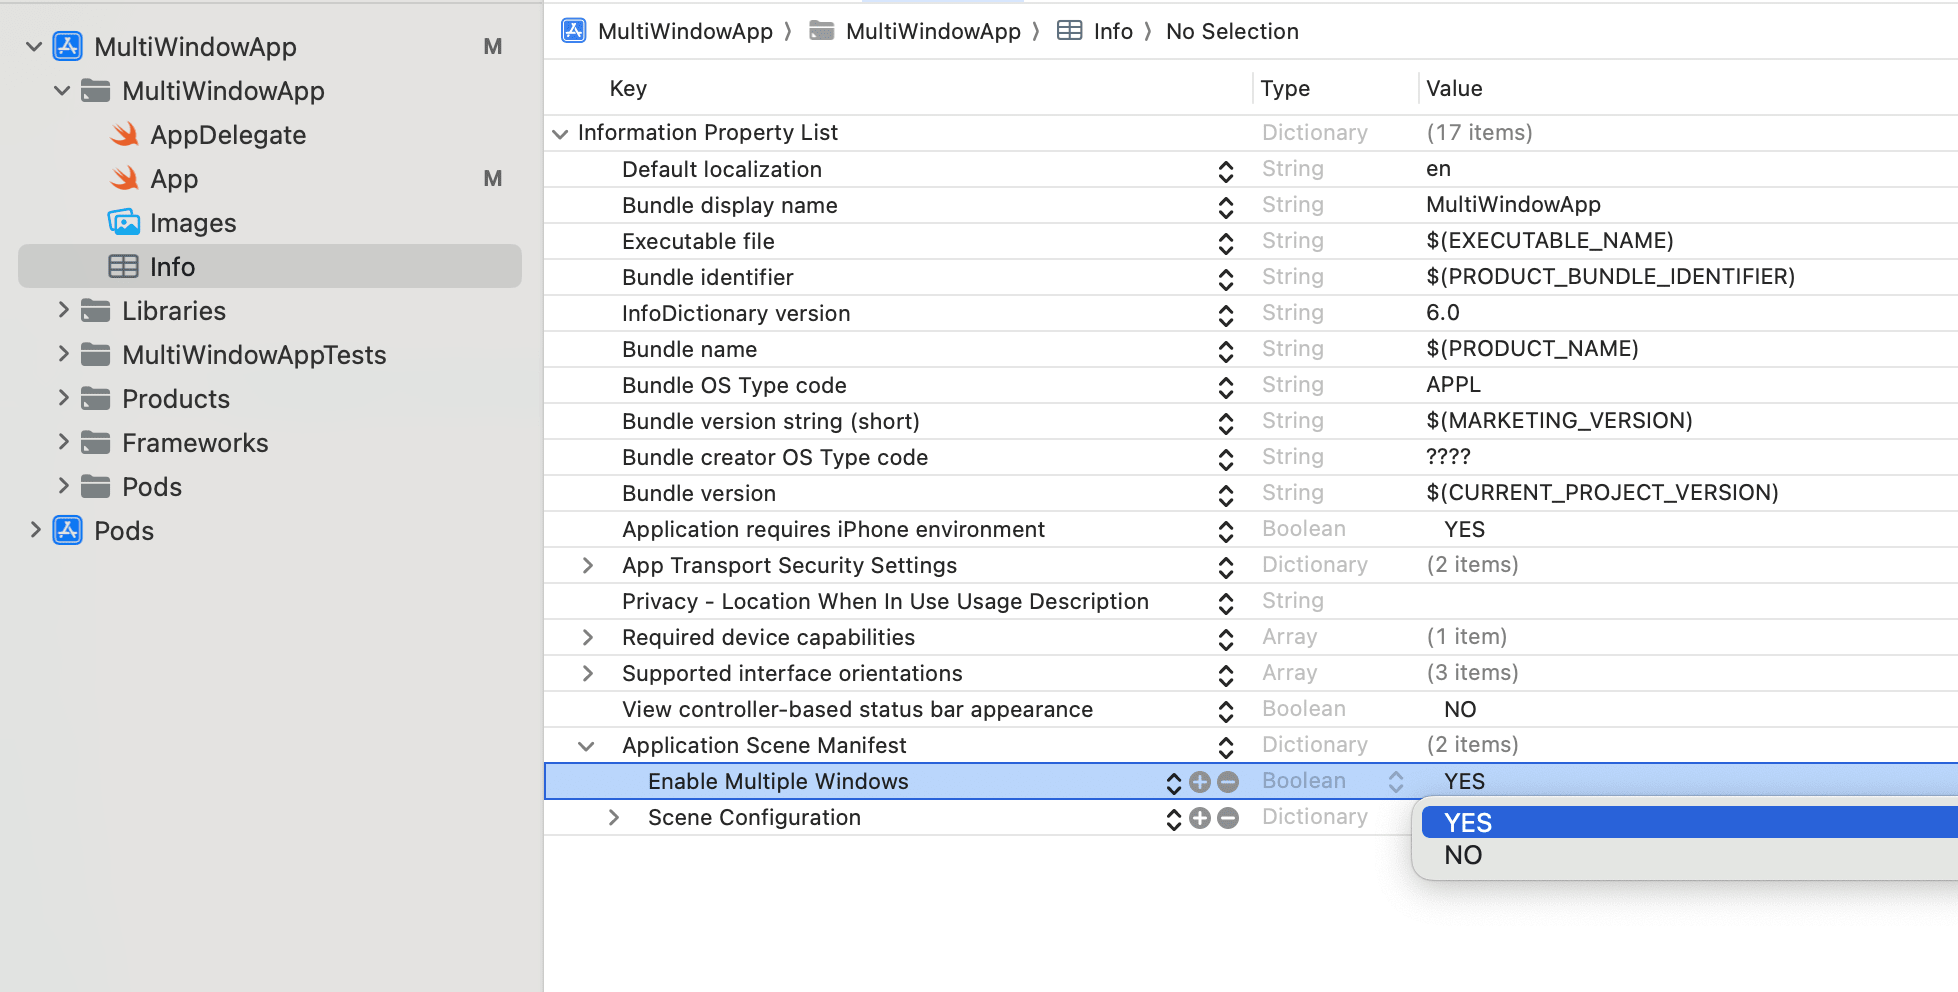
- Enable multiple window support in
Info.plistby changingUIApplicationSupportsMultipleScenestotrue:
- Add additional
RCTWindowinvisionos/App.swiftwithreactContext, which allows us to share pass data between JS and native. Make sure that theidis unique for each window and matches the one in the JS code.
@main
struct MultiWindowAppApp: App {
  @UIApplicationDelegateAdaptor var delegate: AppDelegate

  @Environment(\.reactContext) private var reactContext

  var body: some Scene {
    RCTMainWindow(moduleName: "MultiWindowApp")
    RCTWindow(id: "Counter", sceneData: reactContext.getSceneData(id: "Counter"))
  }
}
- Declare new JS component in
index.js
Let's create a component that's going to be used as our window:
import React from "react";
import { View, Text, Button } from "react-native";

export const Counter = () => {
  return (
    <View>
      <Text>Count: 0</Text>
      <Button title="Increment" />
      <Button title="Decrement" />
    </View>
  );
};
And add it to index.js file:
AppRegistry.registerComponent(appName, () => App);

// Additional windows
AppRegistry.registerComponent("Counter", () => Counter);
Next, let's add some code to open and close the window:
import { WindowManager } from "@callstack/react-native-visionos";
import React from "react";
import { StyleSheet, Text, View } from "react-native";
import Button from "./Button";

// Retrieve the window
const counterWindow = WindowManager.getWindow("Counter");

function App(): React.JSX.Element {
  return (
    <View style={styles.wrapper}>
      <Text style={styles.title}>
        React Native visionOS MultiWindow example
      </Text>
      <View style={styles.row}>
        <Button title="Open Window" onPress={() => counterWindow.open()} />
        <Button title="Close Window" onPress={() => counterWindow.close()} />
      </View>
    </View>
  );
}
Pressing on buttons should open new window. We are all set! Now, let's discuss state managers.
Choosing state manager
In most cases choosing state manager lies in personal preferences, performance, API design and more. However when it comes to sharing data across multiple windows the options are limited. As you saw from the setup above we have separate React roots, one for each window. Which makes using state managers that require wrapping our app in a provider not a viable option.
React Native is sharing the same javascript context across windows. Which makes it possible to either pass some custom store to the App and Counter or use a state manager like Zustand that does it for you without need to wrap the apps with a Provider.
Let's install Zustand and create a simple store to share data.
yarn add zustandCreate a file called store.ts and implement a simple store:
import { create } from "zustand";

type CounterStore = {
  count: number;
};

type CounterActions = {
  increment: () => void;
  decrement: () => void;
};

export const useCounterStore = create<CounterStore & CounterActions>((set) => ({
  count: 0,
  increment: () => set((state) => ({ count: state.count + 1 })),
  decrement: () => set((state) => ({ count: state.count - 1 })),
}));
Next, let's use the store in both of our windows (main one) and the Counter window:
import { WindowManager } from "@callstack/react-native-visionos";
import React from "react";
import { StyleSheet, Text, View } from "react-native";
import Button from "./Button";
import { useCounterStore } from "./store";

const counterWindow = WindowManager.getWindow("Counter");

function App(): React.JSX.Element {
  const [count, increment, decrement] = useCounterStore((store) => [
    store.count,
    store.increment,
    store.decrement,
  ]);

  return (
    <View style={styles.wrapper}>
      <Text style={styles.title}>
        React Native visionOS multi window example
      </Text>
      <View style={styles.row}>
        <Button title="Open Window" onPress={() => counterWindow.open()} />
        <Button title="Close Window" onPress={() => counterWindow.close()} />
      </View>
      <Text style={styles.title}>Count: {count}</Text>

      <View style={styles.row}>
        <Button title="Increment" onPress={increment} />
        <Button title="Decrement" onPress={decrement} />
      </View>
    </View>
  );
}
And inside of Counter.tsx:
import React from "react";
import { View, Text, StyleSheet } from "react-native";
import Button from "./Button";
import { useCounterStore } from "./store";

export const Counter = () => {
  const [count, increment, decrement] = useCounterStore((store) => [
    store.count,
    store.increment,
    store.decrement,
  ]);

  return (
    <View style={styles.wrapper}>
      <Text style={styles.title}>{count}</Text>
      <Button onPress={increment} title="Increment" />
      <Button onPress={decrement} title="Decrement" />
    </View>
  );
};
Now we have seamless data sharing across two windows! Demo:
That's all
And that's it! I hope you found this article useful. If you have any questions or feedback feel free to reach out to me on Twitter.
For those interested in the sample code, you can find it in the GitHub Repository.